Jean Meyblum - Game Programer
Portfolio
  • Home
  • Projects
  • Scripts & Tutorials
  • About Me

Game Programer

Hi, I'm Jean Meyblum. I'm a Game Programer working mostly with UnrealEngine and Unity, and also using C++, C#, Java through my projects. That's for short. You're pleasantly invited to have a more specific look at some of my works and you can also have more information about me by clicking the button below.

Contact

Line of Sight for AI Agent using Camera in Unity

3/12/2014

7 Comments

 
Photo
I am currently working on an AI system in Unity for a stealth game but where the enemies are those that infiltrates and the player has to defend a specifc location, for example an object the enemies will try to steal. I wanted AI agent to act like I am when playing such a game, like hiding behind walls, hearing enemies footsteps, flee when an enemy is coming closer. I wanted my AI agent to have the same information as a real player. In a game there is mainly two information sources : what we see and what we hear. This article concerns the first source. How to give the AI agent a way of knowing what it sees.

Discussion

Unity gives many ways of analysing the game world. It has functions like Physics.RayCast(...) or Physics.OverlapSphere(...), it gives us also information about bounds, meshes and renderer. For my project, AI agents must be able to look for places to go, to have access to all objects they see and are interested in. 

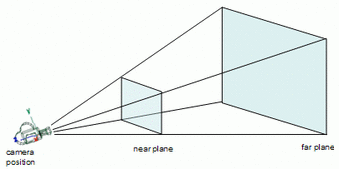
As I was thinking about what's a view, and how to give it to an AI agent, I was considering what are the view properties, it has a field of view, a facing direction, an origin and how far we see. I realised that this description is a good description of a camera. So why should I make a camera-like component if I can try using the existing Unity camera component.

I tried to figure out if there was a way to know every gameobject present in the line of sight of the camera in Unity. There is, but it is too time and memory expensive (I'll be happy to show you how). There are other information you may think of using like using renderer.isVisible, OnBecameVisible(), OnWillRenderObject() but you'll have to attach a script to every object you want your AI to be able to see. Besides, renderer.isVisible doesn't tell you from which camera it is visible, and none of these method takes care of occlusion. All these datas are hard to work with knowing we are working with mutliple camera. 

Know if GameObject is in AI Line of Sight

My idea is to attach a camera on every AI agent, a viewsensor. The camera is set with a certain field of view, and a far plane.  Unity has two handy functions for camera testing, the first one gives back the 6 planes defining the camera frustum, and the second one tells if a bounds object is inside or outside the camera frustum.

Now we can know if a gameobjet is inside our view but not if we can see it because it may be hidden by another object closer the camera position. So I use linecasts to know if we can see the object. But to which position should I cast? Object center position is a good choice but not necessarily accurate enough. I use the object mesh bounds, and go through all the bounds positions and stop when a linecast don't go through anything and then I know a see the object. 

The perfect way would be to do a linecast between each vertice of the mesh but it would be too much time expensive.

Get All the GameObjects

Now we have a function telling us if a specific object is in AI line of sight, I just test every object given by an overlapping sphere check starting on the camera position and with a radius of my camera far plane distance. I call my previous SeeGameObject function on each object and keep those are in line of sight in an array.

Code

7 Comments

Basic Electronical Circuit in Unity

2/19/2014

4 Comments

 
Photo
This is a small unity package I made which offers many possibilities of use. It let you use the Unity Editor scene hierarchy to create an electronical signal that goes from children to their parent. You can activate everything you want regarding on condition connectors in the hierarchy. Let's have a small example: Imagine you have an AND connector that has two children. The AND connector will only be activated if both the children are. Of course for this to work the children you want to act as signal transmitters must have a script component derived from the BaseConnector class attached to them.

This system is cost-free. Any signal that changes will update all its parents the same game frame.

The package comes with prefabs, that are just empty gameobjects with one of the different condition connectors script attached to it. Of course they are juste example, and the different script can be attached to any object you want.
connector.unitypackage
File Size: 8 kb
File Type: unitypackage
Download File

How to use it

Each connector, that means each gameobject you want to use in an electronical circuit, must have a script component that derives from the BaseConnector script. At any time, such a gameobject can know if its signal is activated by accessing the connector component and by reading its Activated property which is a boolean value. Besides, everytime the signal changes, the gameobject receives a message that calls any OnReceiveFromConnector(bool b) methods he has on its scripts. The boolean b tells us if the signal is on or off. So there is no need for you to check the Activated property at each frame since every time this property changes you get a call of the OnReceiveFromConnector(bool b) function.

Additional feature

Any connector comes with an empty public gameobject property that you can set in the editor. You can put here any gameobject you want. This gameobject will now receive the OnReceiveFromConnector(bool b) mehtod call too. It can be usefull when you don't want a gameobject to be part of a connector hierarchy but still have notification of changes from one of them.

Loop: a special connector

If you look in the package there is a connector called LoopConnector, and if you look on any connector, you can see a public list of loop connectors you can set in the editor. This connector lets you make loop on your circuit and also let you send a signal received on a specific circuit to another circuit. To do so, you just have to add the Loop connector gameobject to the loop connectors list from where you want the signal to be sent. The signal will be received by the loop connector and will be its signal value.

Input Connector

Input connector are connectors that don't process their children signals. By default, if you create a new connector, it will not take into account its children and will be an input controller. For example, the loop connector is an input connector. To process children signals, you just have to override the OnReceiveFromChild(bool activate) method in your script.

What can I do with this ?

I think you can do lots of thing with this package. Here are some ideas in which I would use it:
  • Button system to have a complexe system to open doors, switching lights, etc...
  • Dialog system to unlock dialog options
  • Quest system to make multiple way to achieve a same quest
  • Crafting system to have complex recipes
  • Simply for an electronical circuit and to be as creative as some minecraft redstones players !

Code overview

This is the base class for connectors.
4 Comments

Contextual Camera Manager in UnrealScript

2/18/2014

4 Comments

 
Photo

Introduction

This post describe a tool I made to help friends artists of mine in their bachelor final 3D game project. It's a tool allowing to easily manage the camera in the game. The game was a third person game during medieval samurai time. They wanted to have a classic third person view, but also contextual views when the character enters specific locations which means they wanted the camera to be fixed in a position (for example a corner of a room) and to face the character position.

Implementation ideas

CameraManager

I wanted to make something easy to use, both for me as a programer but also for the artists. The next points describe my implementation ideas.
  • The process calculating the camera location and orientation must be separated in a specific class, a Manager, designed as a Singleton. I named it CameraManager.
  • Initially, it's our PlayerPawn class who manage the camera movements, via the CalcCamera(...) pre-defined function. Now this function will only do one thing: to call the camera manager to handle this process by calling its UpdateCamera(...) function.
  • The camera manager works with what I called CameraModes. when processing the camera movements, the manager uses the current mode it has been set to, to know how to process it. We can also change the current camera mode to easily modify our camera behaviour and make the camera manager automatically and smoothly interpolate.
  • The camera manager keeps track of three modes: the current mode it uses, the previous mode, the default mode. The previous mode can be usefull when you want to go back from the current to the previous mode. The default mode is the mode the manager will use if it has no other mode. Typically, in this game the default mode is of type ThirdPersonCameraMode and is used most of the time.

CameraMode

Don't be afraid if you didn't understand clearly yet what a camera mode is and how it works. Describing the four camera mode I made will help you to get it.

The four camera modes I made:
  • ThirdPersonCameraMode: Giving this mode to our manager will make the camera behave like a third person view, that can be moved using the mouse or the stick. It handles wall collision and can be parameterized with min, max and default distance we want from the character, and also how high we want the camera to look at relatively to the pawn pelvis.
  • FixedCameraMode: With this mode, we will have a fixed camera parameterized with a location, default rotation and a boolean to let us choose if the camera must always dynamically look at the pawn.
  • FixedThirdPersonCameraMode: very similar to the first one, it's a third person view but where the player can't move the camera aroud the player. It has the same parameters plus one that is the fixed rotation we want th camera to be set to.
  • SpyRightCameraMode: It's a very specific mode I made to see what my mode-system allows me to do. This mode should be set when we're hiding behind a wall and when we are close to its right edge. It will allow the player to see slightly behind the wall by moving the camera to the right. It works pretty well but have still a very little bug. Of course, it's very easy to do the same for a left wall edge but I made this mode for a test and it was not necessary for this game so there is no SpyLeftCameraMode.

CameraVolume

Camera Volume is a derived class of Volume and can be instanciated inside the Unreal Editor. It has a FixedCameraMode property attach to it. You can set all of the mode parameters directly through the editor, on the camera volume property panel. This Volume act very simply: when the pawn enter it, the camera change accordingly to the fixed camera mode set in the volume. When the pawn leave the volume, the manager goes back to its previous mode.

Code Overview

I won't put all the game sources here because the project doesn't belong to me but I'll put everything I described earlier and it's enough to be fairly simply re-used in another project. The classes don't necessarily have the exact same name as implementation name I gave before, and started by "Mugetsu" that is the game name.

CameraManager

The camera manager must be used as a Singleton and must be a member created and handled in the PlayerPawn script.

BaseCameraMode

It's the class which all camera mode should derived from.

ThirdPersonCameraMode

FixedCameraMode

SpyRightCameraMode

CameraVolume (using FixedCameraMode)

The project

Just a small part for interested people that wanted to know more about this project. You can find additional info just here, and I will probably write a few lines about it later on my Project blog page, on this portfolio.

I hope this might help or at least give ideas to someone. Don't hesitate to ask if you've got any questions or problems.
4 Comments

A "Kid-like Crossword" Generator in Unity

2/17/2014

8 Comments

 
Photo
It's a little project I had to make as part of a school Serious Game project. It was made in Unity at the time where Unity didn't have a real 2D mode so I used an external package I found on the Unity Asset Store which is called Orthello2D.

This project contains a homemade crossword algorithms, working on a short given list of words. It's not making real complete without-gap crossword at all, because these one works with big database of words and take quite a time to process. Here is juste an algorithm working with very few words but trying to make the best it can to cross these words together.

The source version you can download below is a rebuild version of it on Unity 4.3.4. It works fine on my computer.

Crossword Generator.zip
File Size: 9878 kb
File Type: zip
Download File

A Really Quick How-To

You can test the generator just by opening the CrossWordsGenerator.unity scene in Unity and play it in the editor. As this application comes from a bigger project, it comes with loading and saving functions from files and creates the crosswords using the crossword.txt file that contains the words and their clue to guess them.

The Generator Algorithm

My algorithm is not extraordinary at all, but give acceptable results. It doesn't assure at all that all words will be on the grid. But it makes its best to have a maximum of words on it.

Here is how it works:
  • Sort the words list by length (descendant)
  • Put the first (= biggest) word of the list on the grid
  • Loop on all the words in the list
  • For each word of the list, find letters in common with words letters on the grid, that gives you a list of potential position
  • Remove from this new list all positions that "if you place the new word there, it will overlap existing words" on the grid. Except if overlapping letters are both equal.
  • Choose one of this position to place the word on. 

That's of course the very basic process but it takes others parameters to be more precise.

That's some features I added:
  • To choose which position to place the new word, I use a score system to find the best position. This score is based on several parameters like: How many intersections it will create with existing words, How much it will increase our grid (the less the better), or little random fuzzer...
  • Not always sorting the words lists by length, but shuffling instead
  • Since we have some random parameters, one list of words won't give us always the same grid. So when generating a grid, I generate a certain amount of them and choose the best, that has the more words and the smallest size.


To work with words easily I make a class that has position and grid features called CrossedWord. The algorithm code is not clean at all, and contains lots of variables strangely named, sorry about that. I let you have a look at it:

8 Comments

Communication between an Android App and Unity

2/17/2014

48 Comments


Introduction

This tutorial shows how to have an android app communicating with an android unity application. It also shows how to communicate between the android java app default code and unity. I had to do such a thing a year ago for one of my teacher that wanted to process data from an external accelerometer directly into unity. He already had an custom android app he made, that can receive these data but no way to send them to a unity game.

I'll assume you already made some android app. For simplification, I won't speak about in default android app creation but just tell you what you need to know to get this done.

How to send information between two Android app

Sending App

There is a simple way to send data from a standard app to another one and it's called a Service. Basically, a service is something inside an app that can broadcast data to any other app that is configured to listen to it. It's a standard android class coming from android.app.Service that can be derived to be used in your app.

Let's have a look on how to that:
  • First of all, create a new class inside your sending app, deriving from android.app.Service. This class is the service that will send an Intent to the others apps.
  • Now you have to make your service running inside your app. To do so, you can start the service in any Activity simply by using startService(new Intent(this, MyService.class)); where MyService is the name I called my new service derived class.
  • When you start it, a new instance of the service is created and directly call its onStart method.

Here's an example of a really simple service, using an Handler and sending data each second. All instructions are commented for you to understand how it works:
  • You must now modify the AndroidManifest.xml file to let Android know this app has a service in it, otherwise it won't work. So you just have to add this line under the <application> section:

Receiving App

We will see now how to receive the data our sender sends us. As this receiver is made for Unity, it has no activity, and work as a plugin for Unity. 

That's what you must do:
  • Create a new android app without any activity
  • Make a derived class of android.content.BroadcastReceiver

Here's an example code that explains the nexts parts:
  • Compile it as a .jar file. Using Eclipse you can do it trhough Eclipse -> File -> Export -> Java -> Jar File, press next, check your project, uncheck all boxes in the right panel, uncheck jar compression, choose a destination file and press done.

Make Unity use our Java Receiver plugin

Importing the plugin

Unity has been made to be able to use external library in a very simple way.

  • Create this hierarchy of folders using the default Asset folder: Assets/Plugins/Android/ 
  • Move your .jar file in it

Now, we have to modify the AndroidManifest.xml Unity uses to add some specifications for our receiver plugin to work properly. The easiest way to get this file is to build our Unity project to run on Android. When we build it, Unity create a manifest during compilation, that can be found in the Temp folder of our project. Copy it and move it next to the .jar file in the Android folder.

  • Modify the manifest by adding these lines under the <application> section:
After <receiver android::name=... you have to add the exact and full location of your Receiver class inside your plugin package. And after <action android::name=... comes the name of the Intent you want to listen at. It must be the same as what you wrote in the Sender in the sendIntent.setAction(...) method.

Using our plugin

Everything is set up now for us to be able to receive data of an other app inside a Unity application. We just have to see now how to use it in a Unity Script:
We're done ! I hope you get all the necessary information to have this working for you. Don't hesitate to ask me if you have any questions or problems. I'll be very happy to help you !

I would like to thank Simon Philippe, a friend of mine, for having worked with me on this code.

As usual, excuse me for all my English mistakes, I'm not a native speaker.
48 Comments

    Categories

    Tous
    Unity
    UnrealScript

    Archives

    Mars 2014
    Février 2014

    RSS Feed


Powered by Create your own unique website with customizable templates.